Experimental Solid Mechanics across Temperature, Time, and Length Scales:
Areas of Interest
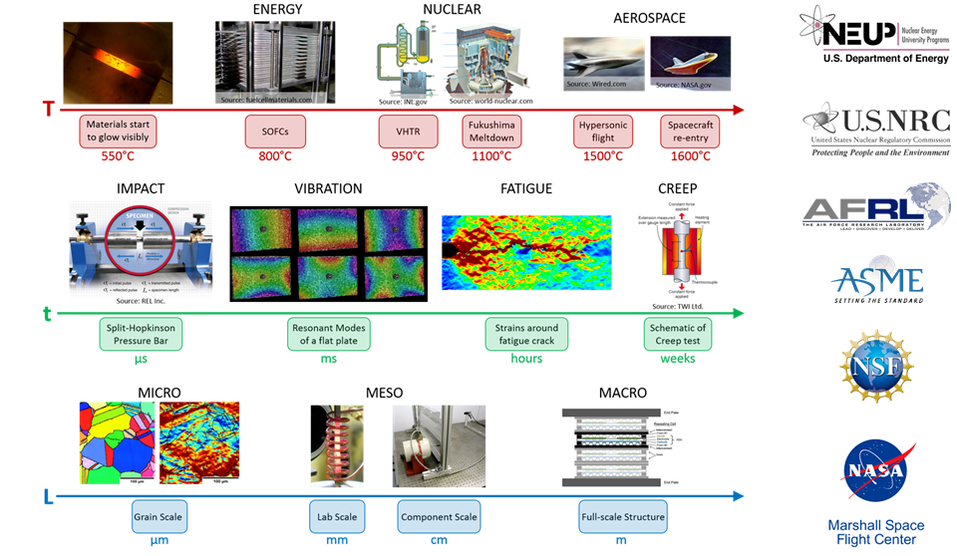
- Solid mechanics: thermo-mechanical loading, ductility, creep, fatigue, environmental effects.
- High temperature material systems: nickel-base superalloys, refractory alloys, ceramic matrix composites (CMCs), ultra-high temperature ceramics (UHTCs), 3D-printed metals
- Extreme temperature applications: spacecraft re-entry, hypersonic flight, gas turbine engines, rocket nozzles, next generation nuclear reactors, accident-tolerant nuclear fuels and cladding
- Experimental methods: High-temperature measurements, in-situ methods, 2D and 3D digital image correlation, high-magnification imaging at long working distances, high-throughput techniques
- Education & outreach: Graduate and undergraduate research, participation of underrepresented populations
Core Strengths
1) Full-field Deformation and Strain Measurement at Extreme Temperatures using UV-DIC
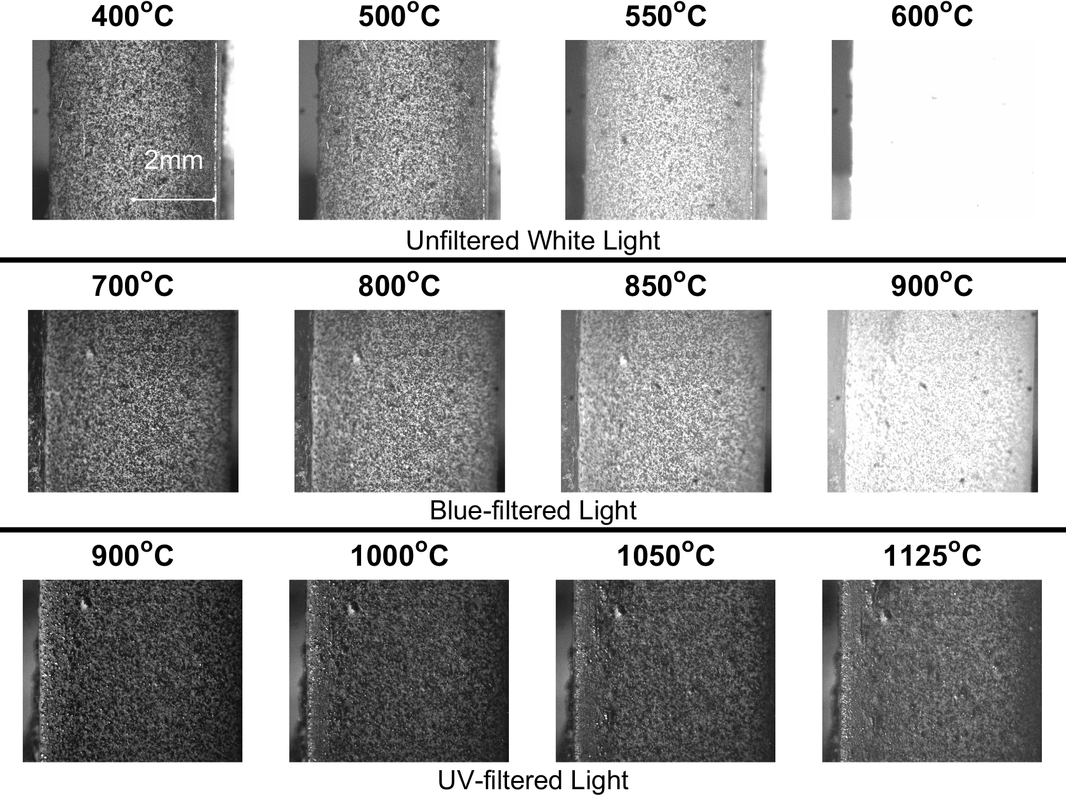
Digital image correlation (DIC) is a popular and versatile method for measuring full-field strains. At high temperatures, test specimens emit light that interferes with camera sensors. The light is less bright at shorter wavelengths and can be mitigated using ultraviolet (UV) cameras and filters. UV-DIC has been demonstrated to at least 1600°C, but in principle can work to even higher temperatures given a material with a high enough melting point. The upper temperature limit of UV-DIC depends not just on the wavelength of light, but also on external lighting and the camera sensitivity at those wavelengths.
Key Publications:
[1] Berke & Lambros, "Ultraviolet Digital Image Correlation (UV-DIC) for High Temperature Applications," Rev. Sci. Instrum (2014).
[2] Thai et al, “Importance of Exposure Time on DIC Measurement Uncertainty at Extreme Temperatures,” Exp. Tech. (2019).
[3] Thai et al, “Change of Exposure Time Mid-Test in High Temperature DIC Measurement,” Meas. Sci. & Tech. (2020).
[4] Thai et al, “Speckle Pattern Inversion in High Temperature DIC Measurement,” Exp. Tech. (2021).
[5] Thai et al, “How Light Emitted at Extreme Temperature Affects Common Digital Image Correlation Algorithms,” Meas. Sci. & Tech. ( 2021).
[6] Jarrett et al, "The Effect of Bit Depth on High Temperature Digital Image Correlation Measurements," J. Sensors (2022)
[7] Rowley et al, "High Speed Ultraviolet Digital Image Correlation (UV-DIC) for Dynamic Strains at Extreme Temperatures," Rev. Sci. Instrum. (2022)
[8] Rowley et al, "Correcting for digital image correlation speckle pattern inversion at high temperatures using color cameras," Appl. Optics (2022)
|
Images taken from a specimen surface at the temperatures indicated using unfiltered, blue-filtered, and UV-filtered light.
The UV images remain minimally affected at temperatures above which the other filter conditions have saturated. [Adapted from Berke & Lambros, Rev. Sci. Instrum. (2014)] |
2) Optical Methods for Extreme Environments
Material failure is often driven by microstructural response to heating and loading. Mechanical engineers and material scientists often use electron microscopy to characterize microstructural-scale behavior, but such measurements are limited to the operating environments that an SEM can withstand. Conversely, optical Digital Image Correlation (DIC) has been demonstrated at temperatures up to 3000°C, but the large standoff distances required to protect the cameras makes high magnification measurements especially challenging. To enable microstructural strain mapping at extreme temperatures, our lab has been developing novel optical methods to expand measurement resolutions under challenging environments.
Key Publications:
[1] Nickerson & Berke, "Ultraviolet Diffraction-Assisted Image Correlation (UV-DAIC) for Single-Camera 3D Strain Measurement at Extreme Temperatures," Exp. Mech. (2018).
[2] Hansen et al, “A High Magnification UV Lens for High Temperature Optical Strain Measurements,” Rev. Sci. Instrum. (2019).
[3] Hansen et al, “Super Resolution Digital Image Correlation (SR-DIC): An Alternative to Image Stitching at High Magnification,” Exp. Mech. (2021)
[4] Craig et al, "Using Text as a Native Speckle Pattern in Digital Image Correlation," J. Strain Analysis (2021).
[5] Van Leeuwen et al, “Stereo Digital Image Correlation with Improved Depth of Field using Tilt-Tip Photography,” Meas. Sci. & Tech. (2021).
[6] Hansen et al, "DIC at Long Working Distances: The Role of Diffraction Limits," Measurement (2022).
|
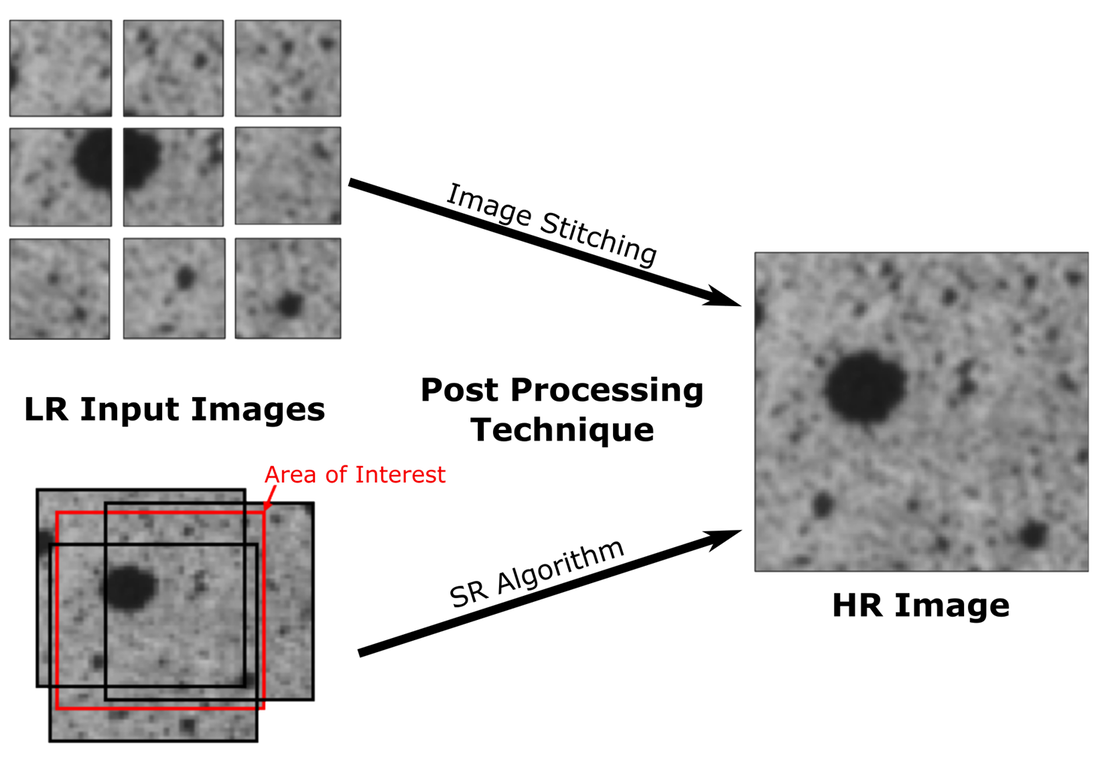
Schematic comparison of two image processing techniques to improve image resolution at high magnification.
Image stitching combines many neighboring images, but often requires a short working distance to achieve such high magnifications. Super-resolution combines many overlapping images, and is more suitable for use at longer working distances. [from Hansen et al, Exp. Mech. (2021)] |
3) Vibration and High Cycle Fatigue
In gas turbine engines, turbine blades must survive cyclic loads at extreme temperatures over millions of cycles, which makes them vulnerable to high cycle fatigue. However, fatigue tests are notoriously slow, requiring many hours to accumulate enough cycles for one point on an S-N curve. To accelerate these tests, AFRL uses a vibration-based method to accumulate cycles more quickly. Our lab has partnered with AFRL to improve these tests by (1) using cameras to reduce dependence on bonded strain gauges (which have a fatigue life of their own and often fail before the test specimen); and (2) developing novel, high-throughput techniques which load multiple specimens in tandem.
Key Publications:
[1] Berke & Walter, “Using Specimen Geometry to Distinguish between Flexural and Torsional Modes when Determining Elastic Material Properties via Sonic Resonance.” J. Test. & Eval. (2016).
[2] Berke et al, “High Temperature Vibratory Response of Hastelloy-X: Stereo-DIC Measurements and Image Decomposition Analysis.” Exp. Mech. (2016)
[3] Furman et al, “Shape Optimization of Rectangular Plates for Vibration-based Fatigue Testing,” J. Appl. Mech. (2021)
[4] Hill et al, “Non-contact Strain Measurement to Eliminate Strain Gauges in Vibration-based Fatigue Testing,” J. Strain Analysis (2022).
|
Finite element simulation of the "two stripe" mode used in vibration-based fatigue testing. Depending on the material and specimen dimensions, this mode cycles on the order of 2000 Hz, which is up to 50x faster than an axial load frame cycling at 40 Hz.
[from Furman et al, J. Appl. Mech (2021)] |
4) High-Throughput Techniques to More Quickly Characterize Damage Accumulation
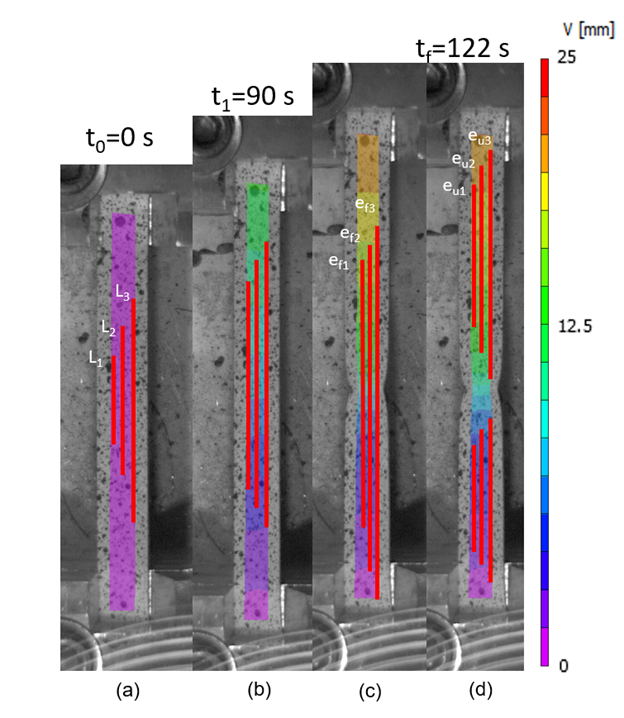
This emerging theme grew out of our collaborations with AFRL to more quickly characterize high cycle fatigue, but we have since expanded it to encompass other forms of damage accumulation including ductility, creep, and low cycle fatigue. By using camera-based strain measurements, we can load multiple specimens in tandem while monitoring strain in each specimen independently. And by utilizing full-field measurements, we can collect many thousands of tests worth of data from individual specimens.
Key Publications:
[1] Berke et al, “Damage Accumulation in a Novel High-Throughput Technique to Characterize High Cycle Fatigue,” J. Test & Eval. (2021).
[2] Smith et al, “A Novel Variable Extensometer Method for Measuring Ductility Scaling Parameters from Single Specimens,” J. Appl. Mech. (2022).
|
Our variable extensometer method obtains thousands of overlapping strain measurements, which can then compute ductility scaling parameters from single specimens.
[from Smith et al, J. Appl. Mech. (2022)] |
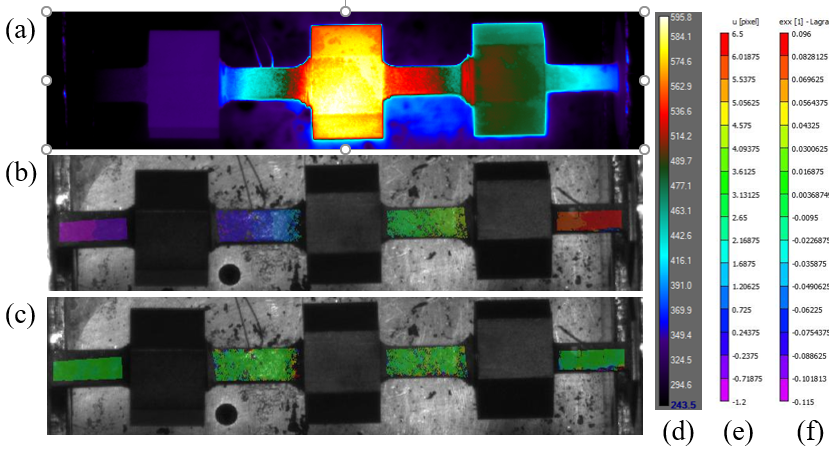
This segmented assembly loads 4 specimens in series. Although each specimen experiences the same force, they each have a different cross-sectional area and thereby experience different stress in proportion to F/A.
The assembly is loaded until one specimen fails, during which the remaining segments also accumulate damage, thus reducing the remaining time until failure for those segments. [unpublished data] |
5) Education & Outreach
Although our main research interest lies in experimental mechanics, we also devote significant effort towards education and outreach. Dr. Berke was the lead PI on a grant from the National Science Foundation (NSF) to explore the barriers and support systems which promote or discourage full participation of LGBTQ+ students in engineering.
Key Publications:
[1] Castaneda-Kessel et. al, “Research Development and Early Career Faculty: Catalysts of Change for Diversity, Equity, and Inclusion in Stem,” Journal of Research Administration (2023).
[2] Parmenter et. al, “Configurations of Sexual and Vocational Identity Processes among Sexual Minority College Students,” Journal of LGBTQ Issues in Counseling (2023).
[3] Pradell et. al, "The Identity-Related Experiences of LGBTQ+ Students in Engineering Spaces,” International Journal of Qualitative Studies in Education (2024).
[4] Pradell et. al, "LGBTQ+ Engineering Students’ Recommendations for Sustaining and Supporting Diversity in STEM," Journal of LGBT Youth (2024).

